Fixed NPM err code ECONNRESET
How to fix NPM err code ECONNRESET
Mar 4, 2023 | Read time 10 minutes🔔 Table of contents
Introduction
Occasionally if you are working on your Node application and getting the error after npm install:
NPM err code ECONNRESET
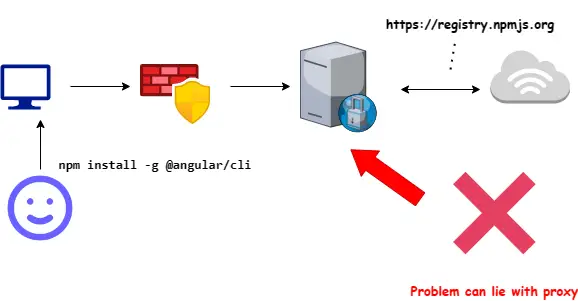
The error of NPM err code ECONNRESET means that when NPM is trying to make a connection to download your packages, the registry, in this case https://registry.npmjs.org),abruptly closed its end of the connection. This can happen if you are behind a corporate proxy or that the registry is overloaded with connections.
As an example, recently when I tried to install a Angular project with first installing angular/cli.
So when I execute the NPM install command npm install -g @angular/cli I get the following error:
C:\Windows\system32>npm install -g @angular/cli
npm http GET https://registry.npmjs.org/yo
npm http GET https://registry.npmjs.org/yo
npm http GET https://registry.npmjs.org/yo
npm ERR! network read ECONNRESET
npm ERR! network This is most likely not a problem with npm itself
npm ERR! network and is related to network connectivity.
npm ERR! network In most cases you are behind a proxy or have bad network settings.
npm ERR! network
npm ERR! network If you are behind a proxy, please make sure that the
npm ERR! network 'proxy' config is set properly.  See: 'npm help config'

npm ERR! System Windows_NT 6.2.9200
npm ERR! command "C:\\Program Files\\nodejs\\\\node.exe" "C:\\Program Files\\nod
ejs\\node_modules\\npm\\bin\\npm-cli.js" "install" "-g" "yo"
npm ERR! cwd C:\Windows\system32
npm ERR! node -v v0.10.17
npm ERR! npm -v 1.3.8
npm ERR! syscall read
npm ERR! code ECONNRESET
npm ERR! errno ECONNRESET
npm ERR!
npm ERR! Additional logging details can be found in:
npm ERR!     C:\Windows\system32\npm-debug.log
npm ERR! not ok code 0
To fix this error, we can try a few things:
- Check your internet connection and network connectivity
- Clear the npm cache
- Disable your antivirus
- Check your proxy settings
- Upgrade to the latest versions of Node and NPM
- Check your
.npmrcfile
1. Check your internet connection and network connectivity
The ECONNRESET error usually means that while NPM is trying to connect and retrieve the package you are after (in my case the angular cli), on the other end, the TCP connection was shut down!
Firstly we have to make sure to have a stable internet connection and try again. For example if you are on a public WiFi this could be patchy and terminate your connection.
There are online tools you can use like SpeedCheck.org (https://www.speedcheck.org/) or even try to ping https://registry.npmjs.org and see the packet response times!
If your internet is good, then move to the next step.
2. Clear the npm cache and reset!
Sometimes your NPM cache might be out of wack and will need to reset it. In many cases, I found clearing the npm cache can fix the issue.
- Our first step, open up the terminal and go to the root of your project directory
- Run the command
npm cache clean --force- this will force delete the NPM cache on your computer. - We need to delete the /node_modules folder with the following command (you might need to use
sudobefore each command):
rm -rf node_modules
- Delete package-lock.json file using the rm command:
rm -rf package-lock.json
- Lastly we can try to run install again
npm install
3. Disable your antivirus: Some antivirus programs can interfere with npm and cause the econnreset error.
Sometimes you can get the ECONNRESET issue when you have an antivirus blocking your connections.
Try disabling your antivirus temporarily and run the npm command again.
For example, previously on some occurances its known that Sophos Endpoint Agent was messing around with the NPM connections and had to disable the ‘Network Threat Protection’.
4. Check your proxy settings
This issue can come up if we are behind a corporate proxy that wants to strip HTTPS.
Coporate proxies usually want to do this to “check for viruses” or whatever random reason :)
Clear current proxy settings
Firstly, run the following commands to clear your current proxy settings:
npm config rm proxy
npm config rm https-proxy
Set new proxy settings
After we have cleared the existing proxy settings, we first need to make sure that we set the registry:
npm config set registry https://registry.npmjs.org/
Now set the new proxy settings with the following commands. Replace the proxyname with your corporate proxy URL.
npm config set proxy http://username:password@proxyname:8080
npm config set https-proxy http://username:password@proxyname:8080
Keep in mind that when you are using username and password, they need to be encoded. For example, if your password is: Welcome@12# then it will be like Welcome%4012%23.
Additionally, with your username, you may need to also include the domain name + username aswell.
For example, lets say we work at a company with domain BIGCORP and your username is johnnyweekend with password Welcome@12#, then your NPM proxy config might look something like this:
npm config set proxy http://bigcorp\\jonnyweekend:Welcome%4012%23@bigcorpproxy:8080
Tip: Check your corporate proxy settings and make sure that they are not blocking NPM registry
Check with your corporate network team that the proxy is not blocking the following URL: https://registry.npmjs.org
5. Upgrade to the latest versions of Node and NPM
Firstly, check your NPM and node versions:
npm --version
node --version
If we can see that the NPM and Node versions are out of date, we can proceed to the following steps:
Option 1: To go https://nodejs.org/en/ and install the latest LTS version
The easiest option is to go to https://nodejs.org/en - find the latest LTS (Long Term Support) version and upgrade node.
It is recommended to install Node.js LTS (Long-Term Support) versions for several reasons:
- Stability: LTS versions of Node.js are designed to be more stable and reliable than other versions. They are rigorously tested and receive regular bug fixes and security updates. This makes them ideal for production environments where stability and reliability are crucial.
- Security: LTS versions of Node.js receive regular security updates that address known vulnerabilities. This helps to keep your application secure and reduce the risk of security breaches.
- Compatibility: Many third-party libraries and frameworks are designed to work with specific versions of Node.js. By using an LTS version, you can ensure that your application is compatible with the latest versions of these libraries and frameworks.
- Long-term support: LTS versions of Node.js receive long-term support from the Node.js community. This means that they will receive bug fixes and security updates for a minimum of 30 months from the time of their release. This provides developers with a stable and reliable platform for building and deploying applications.
Option 2: Use NVM to manage node versions
Now if you dont want to install directly from the website, we can use NVM to manage our node versions.
The benefit of using NVM is that if the latest LTS version that we install does not work, we can pick and choose a different version and test if it works or not!
The steps to get started are as follows:
- If you already have NVM, Uninstall
nvmand reinstall. (Note: You can also use chocolatey to do the install instead of relying on the .exe!)
If you don’t have NVM, For windows, we can go to the binary and install NVM located here:
https://github.com/coreybutler/nvm-windows/tags
For linux distros we can do the following:
sudo apt install curl
curl https://raw.githubusercontent.com/creationix/nvm/master/install.sh | bash
source ~/.profile
nvm install node - Uninstall all versions of node with the following command:
nvm uninstall <node version>
- Reinstall needed node version:
nvm install <node version>
In our case we want to install the latest LTS version so the command looks like:
nvm install --lts
- Use node version just installed:
nvm use <node version>
After we have installed the latest LTS version, the use command can specify as follows:
nvm use --lts
6. Check your .npmrc file
If you want to set the --legacy-peer-deps flag by default for all of your NPM installs, then you can consider updating the .npmrc file.
The .npmrc file is a configuration file used by the Node Package Manager (npm) to manage settings and options for the npm client.
It can be located in four locations:
- the user’s home directory,
- the project root directory,
- NPM install directory
- Global directory
It’s also possible to set environment variables to configure npm. But, the .npmrc file provides a way to configure npm options for a specific user or project, without modifying the environment variables on the system.
So for example, lets say we have a typical folder structure like the following:
my-app/
├─ node_modules/
├─ public/
│  ├─ favicon.ico
│  ├─ index.html
│  ├─ robots.txt
├─ src/
│  ├─ index.css
│  ├─ index.js
├─ .gitignore
├─ .npmrc
├─ package.json
├─ README.md
We can have the legacy-peer-deps flag in .npmrc file.
# .npmrc
legacy-peer-deps=true